| |
|
| Introduction
: |
| |
Our professional video Scaler products have
been serving the industry for many years.
In addition to VideoScalers, Meicheng offers a full line of
high quality PC multimedia ,Standards Converters, DV-to-Analog
Converters,Vieo Mixer, Time Base Correctors, and video processors,
Please visit www.Meicheng.com.tw to learn more details about
these products.
It handles video input from all TV systems NTSC, PAL and SECAM
TV standards. Meicheng CSC-1600HD has many great features
to enhance performance and is ideal for use in professional
large screen presentation studio. |
|
| Features
: |
| 01. |
Video inputs are de-interlaced and scaled up to
output resolution as below.
PC output : 640x 480, 800x 600 (SVGA), 1024 x768 (XGA), 1280
x 1024(SXGA),1280 x 768(WXGA), 1365 x 768
HDTV output: 852 x 480 P, 852 x 576P1280 x 720 P 16:9 ,1920
x 1080i 16:9 |
| 02. |
Automatically accommodates worldwide input video
systems of NTSC 3.58, NTSC 4.43, PAL, PAL M, PAL N, and SECAM. |
| 03. |
High performance adaptive 4H Comb filter Y/C separator
with adjustable vertical peaking. |
| 04. |
Per-pixel motion compensated deinterlacing algorithms
to produce artifact-free progressive scan video signal. |
| 05. |
Built in Adaptive film mode 3:2 pull-down provides clear and
crisp de-interlacing of video originating from 24 fps film,such
as DVD movies. |
| 06. |
Frame rate up conversion from 50 up to 75Hz (PAL), or 60 up
to 85Hz(NTSC) |
| 07. |
Vertical temporal filter(VT) removes jaggy and other de-interlacing
artifacts from normal video. |
| 08. |
OSD menu with adjustable control on Color,Sharpness,Brightness,Contrast
and Tint(NTSC). |
| 09. |
Built-in DCTI/DLTI circuit for color/luminance transient improvement. |
| 10. |
The PC loop-through allows for easy change between video and
PC source. |
| 11. |
Last memory for all adjustments. |
| 12. |
RS-232 interface allows remote control from PC. |
|
| Checking
the Package Contents : |
| The following items are contained in shipping carton: |
| 01. |
Video Scaler Unit |
| 02. |
AC Power Cord x 1 |
| 03. |
VGA Cable-HD 15 to HD 15 x 1 |
| 04. |
1BNC-1BNC video cable x 1 |
| 05. |
S-Video Input Cable |
| 06. |
BNC 5 to 5 BNC Cables |
| 07. |
YCbCr 3 RCA- to 3 RCA cable x 1 |
| 08. |
User Manual |
| 09. |
Remote Control |
| 10. |
4 x Rackmount Screws (Rackmount Vertions only) |
| 11. |
Sample Windows Control Panel Software |
| 12. |
2 x 4A battery |
| 13. |
3 x RCA-M to BNE-F Adaptor |
|
| Connecting
the hardware : |
| |
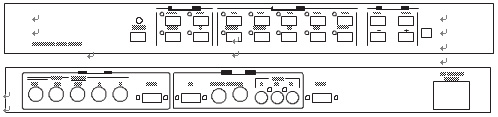
The first step is to connect a video source to
the input of the Video Scaler and to connect its output to a
display device. Below is a photo of the CSC-1600HD rear panel. |
|
|
|
| Rack
Mounting : |
| |
The CSC-1600HD unit can be mountable in a standard
19" (1 RU) EIA rack assembly.
Desktop versions can be converted to rackmount versions by changing
the unit's front panel. Please contact our Service Department
should assistance be required with this conversion. |
| Connecting
the Video Inputs : |
| |
The Video Scaler can accept a Composite Video,
an S-Video or an YCbCr input signal for scaling, as well as
a computer signal input that is passed through the unit when
the PC In (Bypass) is selected. |
| |
Composite Video- use a Composite Video cable to connect the
composite Video output of the source equipment to the connector
labeled " C-Video" on the back of the Video Scaler. |
| |
S-Video - use a S-Video cable to connect the S-Video output
of the source video equipment to the connector labled "S-Video"
on the back of the Video Scaler. S-Video provides improved performance
over Composite Video and is recommended over composite. |
| |
YCbCr Input - use a 3 rca-to- 3 rca YCbCr cable to connect
the YCbCr output of the source video equipment to the connectors
labled YCbCr on the back of the video scaler. Please note the
plugs' color haue to match with the color of the RCA Jacks.
YCbCr composite provides the best picture quality among all
three inputs, and should be used whenever possible. |
| |
Computer RGB with H&V Sync- Connect the source computer's
VGA output signal to the HD 15 connector labled " PC In"
on the back of the Video Scaler. Note - This Computer input
Signal is not scaled, but is available for pass-through when
the Video Scaler is in the PC In (Bypass) Mode. |
| |
Connecting the scaled output to your projector, HDTV, PC monitor
or LCD Display :
CSC-1600HD has two sets of output connectors for you to choose
from the HD-15 D-sub and the RGBHV BNC jacks. Only one of the
two output terminals has signal running on it at one time. |
| |
When one output terminal is selected the other terminal will
have no output signal. You can use the two buttons (HD-15 and
BNC) on the remote control to choose your desired output or
you could go to the "Output terminal" tool bar under
the ON Screen Menu to choose the terminal you want.
The 5 BNC jacks are shared by RGBHV output and YPbPr output. |
| |
When 480P or 576P output resolution is selected the three
BNC jacks from the most left to the center will carry Pr,Y and
Pb correspondingly. In this case only three plugs are needed
to connect the YPrPb output to the destination TV/Monitor. |
| |
For output mode other then 480P or 576P the BNC jacks from
left to right,will carry RGBHV signal respectively. In such
a care, all BNC plugs of the 5 BNCs cable are needed to connect
RGBHV output to the destination TV/Monitor. |
| Connecting
the AC power : |
| |
CSC-1600HD accepts AC input voltage range from 100~240V (50~60HZ).
The unit has a switching power supply installed inside that
will convert the AC input to 12V DC 1A. |
| |
Power ON/OFF switch-Once the AC power is feed into the unit,
the unit enter into standby mode, where a limited current is
provided to the micro processor to allow the remote control
to work. Press the power on switch will turn the unit on to
the normal operation status. |
|
|
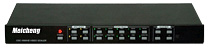
| Controlling
the video scaler : |
| |
The video Scaler is controlled via Front Panel
Push Buttons or remote control and its status is indicated by
Front Panel LED's, and OSD Display. The following photograph
shows the Front Panel Control Buttons and LED Indicators. |
|
|
| Input Selection
: |
| |
Pressing one of the four input Buttons allows
manual selection of the corresponding Video Input signal.
*C-Video button and LED - The LED illuminates when the composite
Video input has been selected.
*S-Video button and LED - The LED illuminates when the S-Video
input has been selected.
*YCbCr button and LED - The LED illuminates when the component.
YCbCr (or YUV) input has been selected.
*PC button and LED - The LED illuminates when the PC bypass
mode has been selected. |
|
|
| Output
Selection : |
| |
CSC-1600HD has ten output selection buttons allow
you to directly select the desired output resolution. Some output
resolution mode may cover more than one horizontal /vertical
scanning frequency.
This scan rate information will be displayed on the screen when
an output selection button is pressed.
To alter the scanning rate under a certain output resolution
please refer to "OSD menu operation" selection. |
|
| |
VGA button and LED -This LED illuminates when
the 640 x 480 has been selected by pressing the button. |
| |
SVGA button and LED - This illuminates when 800 x 600 output
has been selected by presing the button. |
| |
XGA button and LED - This illuminates when 1024 x 768 output
has been selected by pressing the button. |
| |
SXGA button and LED - This illuminates when 1280 x 1024 output
has been selected by pressing the button. |
| |
WXGA button and LED - This illuminates when 1280 x 768 has
been selected by pressing the button. |
| |
480p/YPbPr button and LED - This illuminates when 480p (852
x 480p) has been selected by pressing the button. |
|
| |
while in this mode, only Pr/Y/Pb Connectors (BNC)
are required for connecting the output to the displaying TV/Monitor. |
| |
576p/YPbPr button and LED - This illuminates when 576p (852
x 576p) has been selected by pressing the button. |
| |
While in this mode, only Pr/Y/Pb connectors (BNC) are required
for connecting the output to the displaying TV/Monitor. |
| |
720p button and LED - This illuminates when the HDTV quality
720P (1280 x 720) output is selected by pressing the button
The aspect ratio of the output picture will be converted to
16:9 from original 4:3 on the video input. |
| |
1080i button and LED - This illuminates when the interlacted
HDTV 1080i The aspect ratio of the output picture will be converted
to 16:9 from original 4:3 on the video input. |
| |
1365 x 768 button and LED - This illuminates when the 1365
x 768 output is selected by pressing the button. |
|